I'm very sorry for being so remiss in my postings. Largely it's because I haven't really done anything new. Well, I'm back.
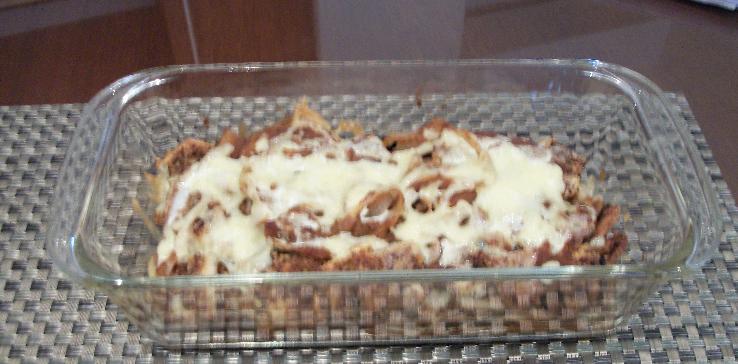
Another good name for this dish would be "lazy person's lasagna." But I'm going with the post title instead.
Ingredients:
150 gr. any type of flat pasta shapes (I used bows), cooked to taste
150 gr. green cabbage, chopped
75 gr. soybean sprouts
10-20 snow peas
4 large mushrooms, sliced
1 bell pepper, chopped
1/4 onion, chopped
3 cloves garlic, minced
1 tsp. olive oil
4-6 tbsp. Ricotta cheese (The one I get is more like a spread)
4-6 thin slices of turkey ham, diced
2 jars of spaghetti sauce, 540 gr. each
Grated Parmesan cheese to taste
Preparation:
Preheat oven to 180 C (around 460 F)
In a deep pan or wok, heat the olive oil. Saute the onion, garlic and bell pepper (I like my bell pepper well-cooked and soft) until the onion begins to turn translucent. Add the mushrooms and keep coking for 2-3 minutes. The add the rest of the vegetables and cook until the cabbage is soft, say for 10-15 minutes.
While this is going on, cook your pasta shapes.
In a baking dish ad a layer of sauce and spread it with a rubber spatula. Then add a layer of pasta (not all the pasta), again, flattening and spreading it with the spatula. Add the ricotta, again flattening and spreading it Add the vegetables and ham, flattening as needed. Next another layer of sauce. Another layer of pasta (now use it all up. A last layer of sauce to cover it all, and spread some Parmesan on top.
You may want to add a little low-fat sour cream or Greek yogurt on top as well. This is entirely optional, naturally. I actually used fresh jocoque, which is a kind of strained yogurt. I like it better as a sour cream substitute, as it is thick and not sweet at all.
Place the dish in the oven for 25-35 minutes, or until the sauce bubbles.
You'll need a spoon to serve it. When you do, it will look like this:
Enjoy!
Showing posts with label low-fat. Show all posts
Sunday, July 7, 2013
Sunday, April 21, 2013
Cottage Cheesecake
I was quite frankly skeptical of this idea but decided to give it a try anyway. My first attempt was ok, but there was room for improvement. So here's what I did:
Ingredients:
1 1/2 Cups regular cottage cheese
1 1/3 Cups non-fat plain yogurt
2 Tbsp. flour
7 Tbsp. granulated Splenda (suitable for baking), or sugar if you'd rather.
2 Eggs
2 Egg whites
Zest and juice of 1 lime
Blackberry marmalade as needed for the topping (or any other topping you want)
Preheat oven to 180 C (350 F)
First you need to reduce the cottage cheese to a thick fluid. Since I've been suing it in other recipes, I did what I always do: mix it with something more fluid, yogurt in this case, in the blender and hit the liquefy setting. It works very well.
Next mix the liquefied cheese and yogurt mix with the rest of the ingredients in a big bowl and whisk them together. the order doesn't matter, but it's easier to leave the lime zest and juice for last. Pour the whisked batter into a greased baking dish and place in the oven for 50 to 60 minutes.
It's a bit hard to say when it's done, as it won't solidify until it cools down a bit first. By my experience, it's done when the mix on the edges of the dish begin to turn golden brown.
Let the pie cool down and spread the marmalade, or the topping of your choice, on top.
The consistency is close to, but quite that, of regular cheesecake. The flavor is very close. For low fat it's really excellent.
I want to try mixing chocolate chips in the batter next. They ought to melt nicely while it melts. Or perhaps add melted chocolate in layers. This would raise the fat content, of course, but it might be worth trying.
Sunday, February 17, 2013
Chicken cutlets with chipotle and morita sauce
Sorry for the delay. I've been doing 12-to-14-hour work days for two weeks, and even working some weekends. I've been too tired to post.
But I did cook (I have to eat, don't I?) So here's what I've been up to:
Ingredients:
10-12 Roma tomatoes (these are the oblong type; I prefer round tomatoes, but they are scarce right now)
1/2 medium onion, roughly chopped
2 cloves garlic, minced
1 Tbsp. vegetable oil
2 dried Chipotles
3-4 dried Morita chiles
1/2 tsp. cumin
1 Chicken bouillon cube, lo-fat and low-sodium
9-10 cilantro branches
220 gr. (about two scoops) cottage cheese
3/4 cup non-fat or low-fat milk
3-4 chicken cutlets (these are skinless, boneless chicken breasts pounded flat) about 800 gr.
Black pepper to taste
Shredded cheese to taste
Low-fat sour cream to taste
First peel and seed the tomatoes. Make sure to place the removed seeds in a colander over a bowl to catch the substantial juice they hold. You'll need it later in the recipe. Next chop the tomatoes into large pieces.
Preheat oven to 200 C (about 390-400 F)
In a big, deep saucepan, heat the oil, then saute the garlic and onion for a few minutes. Add the tomatoes and reduce heat to medium. Add black pepper if you want to. As the tomatoes cook, they'll release some juices. Keep cooking, stirring on occasion, until the tomatoes are soft and they easily break apart. Add the juice you reserved from the seeds. Reduce heat to minimum and keep cooking, again with occasional stirring, until the whole thing bubbles and boils.
While all this goes on, you need to prepare the chiles. First set water to boil in a small pot, then add the dried chiles. Let them boil for five minutes or so. You want them to soften and hydrate them. Some won't soften much, others will soften too much. Either way is ok. Next cut off the tails and discard them. Sit the chiles length-wise and open them, then remove all the seeds (lots of seeds to remove in this recipe, I know). Cut or shred the chiles into smaller pieces.
Now let the tomato mix cool down a bit, then place it in a blender along with the cottage cheese, milk, cilantro, cumin, bouillon cube and chiles. Liquefy well. If you need to do it in batches, make sure you put a bit of everything in each batch. The result should be thick and creamy.
Batches or not, you may want to add the chiles in parts, lest the sauce wind up too hot. If it does, add a little tomato sauce and a bit more cottage cheese (this is a guess).
Ok, next pour some sauce on a baking dish and add half the chicken. Sprinkle some cheese, if you want, pour in more sauce, then the rest of the chicken, then the rest of the sauce. Top with some shredded cheese and low-fat sour cream.
Now place the baking dish in the oven, preheated to 200 C or 390-400 F, for about an hour or until the chicken is cooked through. You may want to check after 40 minutes or so. Serve with plain white rice, if you like mixing it in with the chicken, or with Mexican Rice.
I found the sauce delicious, and there was some left when I was done eating the chicken alter in the week. I saved it to use in omelets. It could also be used to make huevos rancheros (hm, I should try that next week!)
A little side note. Chiles are a bit complicated, especially in Mexico. There are many varieties, and some processed varieties have different names. So for example a Chipotle is a smoke-dried big Jalapeño variety, while the Morita is a dried "sweet" Jalapeño variety. Really. So don't try to find "natural" Chipotles or Moritas. they don't exist!
Sunday, January 20, 2013
Cream of Tomato Soup
This one I made yesterday. Again it's my own recipe, and again it's all made from scratch. About that, I've learned two things: 1) It's very tiring to do everything from scratch, but 2) it's very satisfying.
Without further ado:
Ingredients:
About 1.25 kilos (almost 3 lbs) of round tomatoes, peeled, cored and seeded, then chopped. Oblong tomatoes should work, but the round ones cook faster and better. They're also easier (but not easy) to seed.
1 small or medium clove of garlic, minced
1 thick slice of onion, chopped.
1 Tbsp. olive oil
1.5 liters chicken broth
3/4 Cup low-fat or non-fat milk
5 Tbsp. Cottage cheese (I use regular, which is rather low in fat anyway)
1/4 tsp. Cumin
1/3-1/2 tsp. Paprika
420 gr. Tomato puree (or paste, or sauce)
First peel and seed your tomatoes. This is hard work, and I usually assume my readers know how. But in this case it's important that you seed the tomatoes over a strainer in a bowl, to catch and keep the juice that seeding usually produces. So my method for seeding is to quarter the tomatoes and manually remove the seed parts.
Heat the olive oil in a soup pot and set the onion and garlic to saute. Add the tomato when the onion begins to turn translucent. I cut mine into fairly large pieces, but go any way you want. As they cook, they'll release a lot of juice and will soften considerably; so you want to keep stirring them in order to keep them from burning. When they're soft, add the juice you reserved from seeding.
Cook with the juice until it barely begins to boil. Despite the released juices and the added juice, the mix will be very thick and will form large steam bubbles. So lower the flame to minimum and add the chicken broth. Bring to a slow boil, stirring on occasion.
A word here. I used actually hot water and two low-fat, low-sodium chicken bouillon cubes. The reason is to have a more subtle chicken flavor. If you can do that with broth, great. If not, try my approach.
Good. When the mix boils, turn off the heat and let it cool a bit. You guessed it, the mix will be going to the blender. Do it in batches, adding a little milk and some cottage cheese on each batch. You may want to transfer the soup to a container first, as it's all going back in the pot.
Once it's back in the pot, add the tomato puree, cumin and paprika. Stir well, and again set the heat to low and bring to a slow boil, stirring frequently. Let it simmer a bit after it boils and then serve.
I love tomato soup. I usually have it mixed with boiled, plain white rice and a little lime (yes, lime; I'm like that). Or with crackers and lime, or with croutons and lime, or with rice, crackers and lime. Enjoy!
As I said, it's very satisfying to do it all from scratch (I know I used chicken bouillon cubes and tomato puree). So much so that I later thought "Shouldn't I get canned diced tomatoes?" And I answered myself "No. I might as well get a can of Campbell's Tomato Soup!"
Without further ado:
![]() |
| Another Anchor container |
Ingredients:
About 1.25 kilos (almost 3 lbs) of round tomatoes, peeled, cored and seeded, then chopped. Oblong tomatoes should work, but the round ones cook faster and better. They're also easier (but not easy) to seed.
1 small or medium clove of garlic, minced
1 thick slice of onion, chopped.
1 Tbsp. olive oil
1.5 liters chicken broth
3/4 Cup low-fat or non-fat milk
5 Tbsp. Cottage cheese (I use regular, which is rather low in fat anyway)
1/4 tsp. Cumin
1/3-1/2 tsp. Paprika
420 gr. Tomato puree (or paste, or sauce)
First peel and seed your tomatoes. This is hard work, and I usually assume my readers know how. But in this case it's important that you seed the tomatoes over a strainer in a bowl, to catch and keep the juice that seeding usually produces. So my method for seeding is to quarter the tomatoes and manually remove the seed parts.
Heat the olive oil in a soup pot and set the onion and garlic to saute. Add the tomato when the onion begins to turn translucent. I cut mine into fairly large pieces, but go any way you want. As they cook, they'll release a lot of juice and will soften considerably; so you want to keep stirring them in order to keep them from burning. When they're soft, add the juice you reserved from seeding.
Cook with the juice until it barely begins to boil. Despite the released juices and the added juice, the mix will be very thick and will form large steam bubbles. So lower the flame to minimum and add the chicken broth. Bring to a slow boil, stirring on occasion.
A word here. I used actually hot water and two low-fat, low-sodium chicken bouillon cubes. The reason is to have a more subtle chicken flavor. If you can do that with broth, great. If not, try my approach.
Good. When the mix boils, turn off the heat and let it cool a bit. You guessed it, the mix will be going to the blender. Do it in batches, adding a little milk and some cottage cheese on each batch. You may want to transfer the soup to a container first, as it's all going back in the pot.
Once it's back in the pot, add the tomato puree, cumin and paprika. Stir well, and again set the heat to low and bring to a slow boil, stirring frequently. Let it simmer a bit after it boils and then serve.
I love tomato soup. I usually have it mixed with boiled, plain white rice and a little lime (yes, lime; I'm like that). Or with crackers and lime, or with croutons and lime, or with rice, crackers and lime. Enjoy!
As I said, it's very satisfying to do it all from scratch (I know I used chicken bouillon cubes and tomato puree). So much so that I later thought "Shouldn't I get canned diced tomatoes?" And I answered myself "No. I might as well get a can of Campbell's Tomato Soup!"
Labels:
chicken broth,
cumin,
garlic,
low fat,
low-fat,
onion,
paprika,
tomato,
tomato puree,
tomato sauce
Cream of Chile Poblano
I made this last week, but didn't get around to posting it until today (too many long hour days at the office)
This is an entirely original recipe, mistakes and all. I'm rather proud of it.
Ingredients:
1 kilo Poblano Chiles (about 8 or 9)
1/4 onion, chopped.
1 clove of garlic, minced
1.5 liters chicken broth
5 Tbsp. Cottage cheese
3/4 Cup non-fat or low-fat milk
The preparation is a bit tricky, and very time-consuming.
First you place the chiles on a baking sheet in the upper part of the oven and turn on the broiler to high. You want them to blacken and blister, turning them with tongs as needed (pull out the oven tray when you do so). This is easier said than done, however, as chiles tend to be flat. You'll find the sides won't blacken nor blister much.
When they're done, let them cool for 30 minutes or so. Then you take the skin off. This is easy in some areas and hard on others. I didn't bother to take all the skin off where it got too hard to peel.
Next you chop the peppers into large pieces, being very careful to remove the seeds and veins. Poblanos are considered mild, which is why they can be used for soup and other dishes, but that's rather relative and some are hotter than others. As it was, I did not remove all the veins, so my soup turned out rather on the hot side.
Now heat a little oil in a soup pot and saute the onion and garlic until the onion begins to turn translucent. Add the chopped chiles and saute for 5-7 minutes. Reduce the heat to its lowest setting and add the chicken broth and bring to a slow boil, stirring occasionally.
When it boils, turn off the heat and let it cool a bit. Now you'll be adding the soup to the blender in batches (unless you have a big industrial-type blander), along with the milk and cottage cheese, also in batches. You'll be bringing the liquefied mix back to the pot, so you may want to empty it into another container first. Taste it, too, and see whether it's too hot. if it is, add some more milk and cottage cheese, and, to taste, more chicken broth. Just be careful not to dilute the flavor of the poblanos too much.
Once the soup is liquefied, return tot he pot and bring it again to a slow boil in low heat. Let it simmer a few minutes and serve.
If you like, you can add croutons to the soup once it's served. I like mine plain.
This is an entirely original recipe, mistakes and all. I'm rather proud of it.
![]() |
| I love these Anchor containers! |
Ingredients:
1 kilo Poblano Chiles (about 8 or 9)
1/4 onion, chopped.
1 clove of garlic, minced
1.5 liters chicken broth
5 Tbsp. Cottage cheese
3/4 Cup non-fat or low-fat milk
The preparation is a bit tricky, and very time-consuming.
First you place the chiles on a baking sheet in the upper part of the oven and turn on the broiler to high. You want them to blacken and blister, turning them with tongs as needed (pull out the oven tray when you do so). This is easier said than done, however, as chiles tend to be flat. You'll find the sides won't blacken nor blister much.
When they're done, let them cool for 30 minutes or so. Then you take the skin off. This is easy in some areas and hard on others. I didn't bother to take all the skin off where it got too hard to peel.
Next you chop the peppers into large pieces, being very careful to remove the seeds and veins. Poblanos are considered mild, which is why they can be used for soup and other dishes, but that's rather relative and some are hotter than others. As it was, I did not remove all the veins, so my soup turned out rather on the hot side.
Now heat a little oil in a soup pot and saute the onion and garlic until the onion begins to turn translucent. Add the chopped chiles and saute for 5-7 minutes. Reduce the heat to its lowest setting and add the chicken broth and bring to a slow boil, stirring occasionally.
When it boils, turn off the heat and let it cool a bit. Now you'll be adding the soup to the blender in batches (unless you have a big industrial-type blander), along with the milk and cottage cheese, also in batches. You'll be bringing the liquefied mix back to the pot, so you may want to empty it into another container first. Taste it, too, and see whether it's too hot. if it is, add some more milk and cottage cheese, and, to taste, more chicken broth. Just be careful not to dilute the flavor of the poblanos too much.
Once the soup is liquefied, return tot he pot and bring it again to a slow boil in low heat. Let it simmer a few minutes and serve.
If you like, you can add croutons to the soup once it's served. I like mine plain.
Sunday, August 26, 2012
Sopa de Pasta
This is a rather simple dish commonly served in Mexican homes and small restaurants.
Essentially this is chicken broth with tomato and small pasta shapes. The typical recipe calls for frying the pasta a golden brown. But this being a low-fat cooking blog, I didn't do that. It works as well with un-fried pasta, so long as you don't over-cook it. So first you want to almost-cook the pasta in plain water.
Ingredients:
2 liters chicken broth
200 gr. small pasta shapes,a bit under-cooked
350 gr. peeled, seeded, diced red tomato (or about one medium red tomato, peeled and seeded)
1/3 Onion, quartered
1 clove garlic, quartered
A pinch of fine herbs
1 Bay leaf
Under-cook and drain the pasta and set aside. In a blender place the tomato, onion and garlic. Liquefy the lot and set aside. In a large pot heat the chicken broth slowly, seasoning with fine herbs and a bay leaf (if you've seasoned it when you made it, you can skip this step), and the liquefied tomato from the blender. Stir well.
When the soup begins to bubble, add the pasta and stir. Let it boil, turn off the heat, let it cool a bit and serve.
Traditionally it's seasoned individually with lime to taste. I favor a whole small lime, or half a large one. Other people prefer less. You can also add chopped onion, cilantro or serrano chilies if you like.
![]() |
| The pasta can barely be made out! |
Essentially this is chicken broth with tomato and small pasta shapes. The typical recipe calls for frying the pasta a golden brown. But this being a low-fat cooking blog, I didn't do that. It works as well with un-fried pasta, so long as you don't over-cook it. So first you want to almost-cook the pasta in plain water.
Ingredients:
2 liters chicken broth
200 gr. small pasta shapes,a bit under-cooked
350 gr. peeled, seeded, diced red tomato (or about one medium red tomato, peeled and seeded)
1/3 Onion, quartered
1 clove garlic, quartered
A pinch of fine herbs
1 Bay leaf
Under-cook and drain the pasta and set aside. In a blender place the tomato, onion and garlic. Liquefy the lot and set aside. In a large pot heat the chicken broth slowly, seasoning with fine herbs and a bay leaf (if you've seasoned it when you made it, you can skip this step), and the liquefied tomato from the blender. Stir well.
When the soup begins to bubble, add the pasta and stir. Let it boil, turn off the heat, let it cool a bit and serve.
Traditionally it's seasoned individually with lime to taste. I favor a whole small lime, or half a large one. Other people prefer less. You can also add chopped onion, cilantro or serrano chilies if you like.
Saturday, August 18, 2012
Chicken Milanesas with Chipotle Sauce
A little explanation is in order. A milanesa, before cooking, is any kind of meat steak that has been pounded flat. But cooked, it refers mostly to a thin veal steak covered in bread crumbs and fried in oil. In Spanish this kind of preparation is called "empanizado," which roughly translates as "breaded," if that's even a word. Anyway, a milanesa can also be made with flattened chicken breast, which is what I did.
I should mention by "bread crumbs" I mean a variety of options. The most common is simple "pan molido," which is ground up white bread toast. But there are others, like ground corn flakes, ground bran flakes and even, my favorite, ground wheat bran.
While I came up with this recipe by myself, I don't claim it as my own. Why not? because I'm trying to replicate and adapt someone else's recipe, someone I know and whom I miss very much.
This recipe is a bit more complex than my usual preparations. You have to cook the milanesas, make the salsa, then combine them and bake the result. But it's worth it.
Chipote chilies come either dried or canned. The canned version is "en adobo," meaning it's pickled in a thick, red juice. BTW there's no such thing as a fresh or natural chipotle. Chipotles are actually smoked jalapeños
Ingredients:
4 Boneless flattened chicken breasts
2 Egg whites
About 2 Cups of bread crumbs (see above for details)
2.5 Teaspoons vegetable oil of your choice, preferably one without much flavor like canola or soy.
3 Red tomatoes
3-5 chipotle chilies and some juice from the can (if you're using smoked chipotles, take note they'll be much bigger)
1/2 onion, quartered
2 cloves garlic, quartered
Cilantro to taste (about 3-5 branches, stems and all)
2 Tablespoons white vinegar
1/2 Teaspoon cumin
1 tablespoon oregano (optional)
1/4 cup water.
40 gr. grated white cheese suitable for melting
2 Tablespoons reduced-fat sour cream (optional)
To make the milanesas:
Take a large, preferably rectangular, serving plate and cover with bread crumbs. Put the egg whites in a bowl. Soak the chicken breasts individually in the egg whites and put it on the bread crumbs, turning it over to cover both sides. If needed, pour additional bread crumbs on top.
In a skillet or frying pan pour one (1) teaspoon of oil, and put it on high heat. When it's hot, cook the chicken breasts. Due to the size, you may have to cook them one by one. You should cook each until you see the top under the crumbs turning white, then flip it over to brown the other side. After cooking two, add another teaspoon of oil if needed, and cook the other two.
Put them on a paper kitchen towel over a large serving plate so the excess oil will be absorbed. In regular cooking, milanesas are nearly deep fried. But this is a low-fat cooking blog, after all. You can press them with paper towels, too, to drain more oil. The cut them into bite-sized pieces or strips.
To make the salsa:
Peel and seed the tomatoes and toss them in the blender with the onion, garlic, cilantro, cumin, oregano, vinegar water and chipotles. Liquefy the mixture. as always, this is the time to taste and adjust for spiciness.
Get one onion slice, tending toward thick, and saute it with 1/2 a teaspoon of oil in a saucepan until it's as flexible as cooked spaghetti, or you can do it on the skillet where you made the milanesas. Quarter the bigger rings and leave the smaller ones whole. Either way, pour the salsa from the blender in saucepan. Turn the heat on to low and let the salsa come to a slow boil. Once it boils, let it simmer for a few minutes, stirring occasionally. Remove from heat.
Now, in an oven-safe baking dish lay out a layer of mialnesas in bits and cover them with a layer of salsa. then sprinkle a little cheese and sour cream. Add a second layer of milanesas and, you guessed it, top it off with more salsa. Again sprinkle cheese and sour cream on top.
Put the dish in an oven preheated to 330 F for 30 minutes. All the cheese should melt. Let it cool and serve.
I suggest serving it along with Mexican rice, or any other sort of subtly-flavored rice you like.
Enjoy
I should mention by "bread crumbs" I mean a variety of options. The most common is simple "pan molido," which is ground up white bread toast. But there are others, like ground corn flakes, ground bran flakes and even, my favorite, ground wheat bran.
While I came up with this recipe by myself, I don't claim it as my own. Why not? because I'm trying to replicate and adapt someone else's recipe, someone I know and whom I miss very much.
This recipe is a bit more complex than my usual preparations. You have to cook the milanesas, make the salsa, then combine them and bake the result. But it's worth it.
Chipote chilies come either dried or canned. The canned version is "en adobo," meaning it's pickled in a thick, red juice. BTW there's no such thing as a fresh or natural chipotle. Chipotles are actually smoked jalapeños
![]() |
| Fresh out of the oven! |
Ingredients:
4 Boneless flattened chicken breasts
2 Egg whites
About 2 Cups of bread crumbs (see above for details)
2.5 Teaspoons vegetable oil of your choice, preferably one without much flavor like canola or soy.
3 Red tomatoes
3-5 chipotle chilies and some juice from the can (if you're using smoked chipotles, take note they'll be much bigger)
1/2 onion, quartered
2 cloves garlic, quartered
Cilantro to taste (about 3-5 branches, stems and all)
2 Tablespoons white vinegar
1/2 Teaspoon cumin
1 tablespoon oregano (optional)
1/4 cup water.
40 gr. grated white cheese suitable for melting
2 Tablespoons reduced-fat sour cream (optional)
To make the milanesas:
Take a large, preferably rectangular, serving plate and cover with bread crumbs. Put the egg whites in a bowl. Soak the chicken breasts individually in the egg whites and put it on the bread crumbs, turning it over to cover both sides. If needed, pour additional bread crumbs on top.
In a skillet or frying pan pour one (1) teaspoon of oil, and put it on high heat. When it's hot, cook the chicken breasts. Due to the size, you may have to cook them one by one. You should cook each until you see the top under the crumbs turning white, then flip it over to brown the other side. After cooking two, add another teaspoon of oil if needed, and cook the other two.
Put them on a paper kitchen towel over a large serving plate so the excess oil will be absorbed. In regular cooking, milanesas are nearly deep fried. But this is a low-fat cooking blog, after all. You can press them with paper towels, too, to drain more oil. The cut them into bite-sized pieces or strips.
To make the salsa:
Peel and seed the tomatoes and toss them in the blender with the onion, garlic, cilantro, cumin, oregano, vinegar water and chipotles. Liquefy the mixture. as always, this is the time to taste and adjust for spiciness.
Get one onion slice, tending toward thick, and saute it with 1/2 a teaspoon of oil in a saucepan until it's as flexible as cooked spaghetti, or you can do it on the skillet where you made the milanesas. Quarter the bigger rings and leave the smaller ones whole. Either way, pour the salsa from the blender in saucepan. Turn the heat on to low and let the salsa come to a slow boil. Once it boils, let it simmer for a few minutes, stirring occasionally. Remove from heat.
Now, in an oven-safe baking dish lay out a layer of mialnesas in bits and cover them with a layer of salsa. then sprinkle a little cheese and sour cream. Add a second layer of milanesas and, you guessed it, top it off with more salsa. Again sprinkle cheese and sour cream on top.
Put the dish in an oven preheated to 330 F for 30 minutes. All the cheese should melt. Let it cool and serve.
I suggest serving it along with Mexican rice, or any other sort of subtly-flavored rice you like.
Enjoy
Labels:
bread,
bread crumbs,
chicken,
chipotle,
cilantro,
egg whites,
garlic,
low-fat,
milanesas,
onion,
tomato,
vinegar,
wheat bran
Sunday, August 12, 2012
Mexican Rice
Mexican rice is simply rice with tomato. Some people add peas and carrots to it, some put in a serrano chile for spice. I make mine with only tomato and garlic. Maybe because that's what I had growing up.
Ingredients:
2 Cups of Rice
About 3 Cups of water
2 Red tomatoes, peeled, seeded and cored
1 clove of garlic, quartered
First peel, seed and core the tomatoes and put them in the blender with some water and, if you like, half the garlic. Liquefy the whole thing. Measure carefully how much liquid you've produced. Rice is simple, but tricky to make. You want 5 cups of fluid for two cups of rice. So add enough water to complete five cups. Most blenders have measures on the sides. if not, use a measuring cup.
Once you have the five cups of liquid, pour them in a pot and bring them to a boil. When the mixture boils, reduce heat to minimum and add the rice and garlic (either the whole clove or half). Let it cook uncovered until the liquid is consumed, then fluff with a fork and serve.
As I said, rice is tricky, especially boiled rather than fried rice. If you use too little liquid, the rice winds up hard. if you use too much, it winds up with the texture of paste. Boiled rice will clump, no way to help that. but you don't want it too turn to mush when you try to un-clump it. So be careful with measurements.
Also make sure all the liquid is consumed. Some of the rice on the bottom may burn. If it does, just scrape it off and throw it away.
Cottage Cheese Enchiladas
Finally :)
The point is to get fresh, wide tortillas. Otherwise making low-fat enchiladas is just too difficult. You see, most people will fry the tortillas. In low-fat cooking that's obviously a no-no. But plain tortillas tend to crumble when folded, especially if they're a day or two old.
I think it's best to give the recipe for the salsa separately, so:
Salsa
Ingredients:
14-18 green tomatoes without the husk
1/2 onion, quartered
2 cloves garlic, quartered
Cilantro to taste (about 3-5 branches, stems and all)
4 Serrano chilies, or other small green chilies.
2 Tablespoons white vinegar
1/2 Teaspoon cumin
1/4 cup water.
Boil the tomatoes until they begin to change color, then place them in a bowl of ice water. Next quarter them and put them in the blender, removing the core first. Add the other ingredients tot he blender and liquefy the whole thing. You may want to do this in two batches unless you have a big blender. BTW this is the time to taste the salsa and see whether it's too hot or no hot enough, and to adjust the ingredients accordingly.
Pour the salsa into a deep saucepan or pot and turn the heat on low. Let it come to a boil slowly, stirring from time to time. Let it boil for a few minutes, stirring occasionally. Then remove from heat and set aside.
Enchiladas
Ingredients:
The salsa from the previous step
200 gr. Cottage cheese (or more)
70 gr. grated white cheese suitable for melting
2 Tablespoons reduced-fat sour cream (optional; personally I don't like it in my enchiladas)
Fresh, wide, corn tortillas, as many as necessary
Chopped onion to taste
First the tortillas handle better when hot. My preferred method is to heat them on a comal on the stove. A comal is a flat, round piece of thin metal that holds 3 or four tortillas. If you don't have one, you can use a wide skillet, or even put them in the microwave for thirty seconds wrapped in a clean kitchen cloth.
So, heat the tortillas a few at a time. Carefully, as they're hot, spoon some cottage each on one and fold it in on itself. Place it on an oven safe glass baking dish with the fold side down. If it opens as soon as you let go, you have the wrong kind of tortilla. Repeat as many times as necessary. In the photo above there are about 8 enchiladas.
Next pour salsa generously on top, making sure to cover all the enchiladas. Try not to use it all, as a reserve may come in handy later. Sprinkle the grated cheese evenly on top and, if you want, the sour cream as well.
Place in an oven pre-heated to 300 degrees F (you may want to pre-heat the oven before you get started) for thirty minutes. Remove from the oven, let it cool and serve.
For serving, put freshly chopped onion on the table to sprinkle on top. Also perhaps additional salsa, as you should have some left over. If you reheat them in the microwave, BTW, they tend to dry out. When I reheat them I pour some salsa on them before putting them in the microwave, so they'll be moist when done.
I also like to serve them with Mexican rice. The recipe for that will be along shortly.
Monday, August 6, 2012
Kathy's Lentil and Barley Casserole
I'm not really sure if this qualifies as a casserole, but I like the sound of it.
Again, this is an original recipe. Mostly I took what i found in the fridge, plus lentils. I like how it came out.
Ingredients:
1 Cup lentils
4 Tablespoons Barley
1 Cup of rice cooked to taste (the cup refers to pre-cooked measurement)
1 Clove of garlic, minced
1/2 Onion, chopped
1 Green Bell pepper, diced
4 Strips of turkey bacon, sliced
4 Turkey sausages, sliced
1 Cup soybean sprouts
1/4 Green cabbage, chopped
1/3 Teaspoon ground cummin
1 Teaspoon oregano, crushed
A pinch of fine herbs, crushed
1 Teaspoon vegetable oil (any kind)
1.5 Liters of water
Preparation:
Heat the oil in a pot and add the bacon. Cook for two or three minutes, then add the onion and garlic. Cook until the onion begins to turn translucent. Add the rest of the vegetables and the sausages, and cook until the cabbage begins to soften.
Add the water and reduce the heat to minimum. Add the lentils and barley and stir well. When the water begins to warm, add the spices and stir well. Let the water come to a boil, stirring occasionally. Keep boiling until most of the liquid is consumed or the lentils are tender. At this point add the cooked rice and stir well to mix everything together. let the whole thing sit on the flame for a bit longer, then let it cool and serve. You want as little iquid as possible, but if some remains that's not a problem.
Labels:
barely,
bell pepper,
cabbage,
carrot,
cumin,
garlic,
Lentils,
low fat,
low-fat,
onion,
rice,
soybean sprouts,
turkey bacon,
turkey sausage
Thursday, July 26, 2012
Kathy's Citrus Cabbage Salad
I tried something unusual and entirely original. At leas, I came up with the recipe all on my own. So I'm putting my name on it.
Ingredients:
Salad:
1/3-1/2 a Head of red cabbage, chopped
1 Teaspoon olive oil
2 Cloves of garlic, minced
1/3 Onion, sliced
2 Carrots, thinly sliced (you may want to use a slicer, like a Presto Salad Shooter)
1 1/2 cups soybean sprouts
Ground black pepper to taste
1/4 cup orange juice
1 Tablespoon balsamic vinegar
4-5 mushrooms, sliced
Dressing:
1 Teaspoon olive oil
1 Teaspoon sesame seed oil
1 Teaspoon honey
1 1/2 - 2 Teaspoons mustard (I used plain yellow mustard, but any mustard is good mustard)
1 Tablespoon balsamic vinegar
Ok, in a large, deep saucepan or a wok, heat the olive oil and roast the garlic in it for about a minute. Add the carrots and onions and cook for about two minutes more. Sprinkle some black pepper, stir well. Add the cabbage and soybean sprouts. Continue cooking for 2 minutes. In a cup mix the orange juice and 1 tablespoon of vinegar. Add it to the pan and stir well. Cook for about three minutes more, but don't let the vegetables get too soft. Remove from heat.
With a slotted spoon or a large serving fork, transfer the vegetables to a salad bowl, leaving in the pan most of the remaining o.j. vinegar mix. Add the raw, sliced mushrooms.
In a bowl mix the dressing ingredients and whisk well. You want a brownish, thick, homogenous mixture. When you get it, add the liquid left in the pan and whisk some more. Again, you want a homogenous mixture.
Pour the dressing on top of the vegetables and toss well.
I recommend letting it cool before serving. In fact I cooked this rather late yesterday, so I put it in the fridge overnight. I had it for lunch the next day and it was delicious at room temperature. I do like to let salads soak in dressing overnight, too.
Sunday, July 22, 2012
Simple spaghetti recipe
I didn't feel like making anything complicated this weekend, so I got some spaghetti and Prego sauce. If that were all, I wouldn't post about it, but I tend to add some things to the store-bought red stuff.
Ingredients:
350 gr. Spaghetti cooked to taste
1 Jar Spaghetti sauce (about 650 gr. if memory serves)
1 Cup snow peas
1 Cup Soybean sprouts
1/3 Red onion, thinly sliced
1 Clove garlic, minced
1/2 green bell pepper, chopped
1 teaspoon olive oil
1/3 teaspoon fine herbs
1 Tablespoon oregano, crushed
Ground black pepper to taste
2 Turkey sausages, diced
A dash of Worcestershire sauce
I've found it best to prepare the pasta and sauce at the same time, because cooked pasta left in a colander tends to get sticky. It also helps to spray the cooked pasta with cold water after draining it.
So, in a deep saucepan, and I mean deep, or a pot, heat the olive oil. Saute the onion and garlic until the onion begins to turn flexible. Next add the bell pepper and keep cooking for two minutes. Add the soybean sprouts and snow peas, and sprinkle the black pepper. Cook for a few minutes longer until the vegetables are cooked to your taste.
Next reduce heat to minimum and add the jar of sauce and stir. Add the fine herbs, oregano, Worcestershire and sausages next, stir again. Bring the whole thing to a slow boil, and add the cooked Spaghetti (if it's done then). Stir/toss the pasta to mix it well with the sauce and veggies.
The added vegetables make the sauce really thick, so it's easier to ad the pasta to it rather than the sauce to the pasta. Also, commercial Spaghetti sauce already has oregano, so taste it beforehand and see if you want to add more.
I have been looking for recipes for tomato sauce to make my own, but I haven't had much success there. One time I attempted my own recipe with tomato puree and spices. The result were ok, but no better than store-bought sauce, so why bother?
On the plus side, my inability to find good recipes led me to develop my own recipe for Green Bell Pepper Fettuccine, which led to the recipe for Fettuccine with Poblano Chile Sauce.
Labels:
bell pepper,
garlic,
low fat,
low-fat,
olive oil,
onion,
oregano,
sauce,
soybean,
Worcestershire
Sunday, July 15, 2012
Chicken and Lentil stew
I did take a break from the sweet and sour, and the tomato-based dishes. Instead I retook my budding love affair with lentils, which are both tasty and versatile, if not particularly colorful... In other words, this weeks' dish isn't much to look at, but it's tasty.
You may notice some similarities to my Dry Lentil Soup. I've been thinking about using lentils in a stew since then.
Ingredients:
1 Chicken breast without skin and bone, cut in bite-size pieces
1 Cup green lentils
1 Tablespoon olive oil
1 Large green bell pepper
2/3 Red onion, chopped
2 cloves of garlic, minced
2 Carrots, diced
2 Medium-sized potatoes, diced
1 Cup soybean sprouts
2 Cubes chicken bullion, low-fat, low-sodium
1/3 teaspoon ground black pepper
1 teaspoon cumin
1/3 teaspoon fine herbs
1/3 teaspoon dried pesto
1.75 liters of water
3 1/2 Tablespoons corn starch dissolved in 1/4 cup of water
First let the lentils soak for a few hours. Next cook the chicken on a skillet with a little oil or cooking spray and set it aside.
In a pot heat the olive oil, saute the onion, garlic and bell pepper until the onions turn translucent, then add the potatoes and carrots, and sprinkle the black pepper. Saute for about 3 minutes. Add the water and reduce heat to medium. When the water warms up, add the lentils, spices and chicken bullion cubes. Stir well and reduce heat to minimum. When you see any bubbles, add the chicken. Stir again.
Let it cook for about an hour and fifteen minutes (your times may vary), or until both the potatoes and lentils are tender. Add the corn starch dissolve din water for a thicker consistency, stir well. You will then see larger bubbles forming. Remove from the flame, let it cool and serve.
I'm not entirely satisfied with the end result, but right now i can't think of any improvements.
See you next week!
Sunday, July 8, 2012
Sweet and Sour Cabbage, Second Draft
I'm more nearly there, I think, but the recipe still needs some work.
I went in a different direction, foregoing ketchup entirely and using canned pineapple bits in syrup, which happen to be sweet and sour.
Ingredients:
Sauce
1 Cup chicken broth
1/4 Cup Rice vinegar
1/4 Cup white sugar cane vinegar
1/3 Syrup from canned pineapple bits
210 Gr.tomato puree
1 Teaspoon powdered turmeric
3 Tablespoons Soy sauce (low sodium)
3 Tablespoons corn starch dissolved in 1/4 cup of water
1/2 Head of green cabbage
1 Carrot, cubed.
1 Cup snow peas
1 Red onion in thin slices
2 Cloves garlic
1 Teaspoon sesame seeds
1 Cup pineapple bits, drained of syrup
For the sauce mix the chicken broth, both types of vinegar, syrup, tomato puree, turmeric and soy sauce in a bowl and whisk vigorously. Set aside. As always, taste it and adjust ingredients to your taste.
In a pot heat some olive oil. Saute the onion and garlic for a few minute, then add the sesame seeds and saute for another two minutes. Add the cabbage, carrot and snow peas. Don't add the pineapple yet. Stir fry until the vegetables soften a little. Reduce heat to minimum and add the sauce and pineapple. Stir well so everything is well covered in the sauce.
Let the dish come to a slow boil. When it boils, add the corn starch solution and stir well, again making sure everything gets well covered. You'll feel the sauce thicken while you stir. Let it simmer for a minute or two, let it cool a bit and serve.
I'm not satisfied with the dish as it is, or with the sauce. But I think I'm headed in the right direction. I'll likely rest from sweet and sour, and tomato puree (see following post, eventually) for a week or two, then get back to it.
But the way, the sauce does look a little more red than it shows in the photo.
Tuesday, July 3, 2012
Sweet and sour cabbage, first draft
I thought this one up while at work late this afternoon. I've tried some sweet and sour recipes before, but was disappointed with the results. This one comes close to meeting my expectations, but it's not all it could be yet. Think of it as first draft.
Ingredients:
1/2 A head of green cabbage, shredded
1/3 Onion, quartered
2 Cloves of garlic, minced
1 Cup soybean sprouts
1 Cup snow peas
1 Cup chicken broth (Ok, I used a cup of hot water and one cube of low sodium, low fat chicken bullion)
3 Tablespoons soy sauce (low sodium)
4 1/2 Tablespoons vinegar
1/4 cup Ketchup (I used low-sugar ketchup)
2 Tablespoons Splenda (you can use sugar in the same proportion)
Black pepper to taste
1 Teaspoon sesame seed oil
3 Tablespoons corn starch dissolved in 1/4 cup of water
Preparation:
First do the sauce. In a bowl mix the chicken broth (cold or warm, not hot), ketchup, soy sauce and vinegar. Whisk until you can't see lumps of ketchup. Taste to see if it's sour enough. if it isn't, add more vinegar (carefully, you don't want it too sour). Add the Splenda and whisk again. Taste again to check if the sweet and sour balance is ok. if not, adjust as needed by adding more sweetener or vinegar. Just be careful not to mess it up, or to add too much liquid. Set it aside.
Heat the oil in a pot. Add the onion and garlic and saute for a couple of minutes. Add the cabbage, snow peas and soybean sprouts. Sprinkle with pepper, if you want, and stir well. Stir-fry for ten to fifteen minutes, or to the point where you think the veggies are soft enough.
Reduce the heat to minimum and add the sauce (it won't hurt to give it a last whisk). Stir well so everything gets coated. You may need to toss it like a salad. Let it simmer for three minutes and add the corn starch dissolve din water. Stir/toss well again, insuring everything gets well-drenched in sauce. Let it simmer for 3 to 5 minutes, remove from heat and serve.
I need, and I will,make some improvements. For one thing I should add sliced carrots and pineapple bits in syrup (which would alter the sweetener amounts). It might also serve for sweet and sour meats like chicken or pork.
Enjoy!
Saturday, June 23, 2012
Barley Stew
Sorry I haven't posted. Last week I tried some new recipes and they didn't come out quite right. But I've fixed them, and here's the first:
3/4 Cup barley
4 Turkey sausages, sliced thinly
2 Cups shredded red or regular cabbage
1 Cup soybean sprouts
1 Carrot, sliced thinly
1 Small green bell pepper
1 Clove of garlic, minced
1/3 Chopped onion
5 Cups chicken broth
1 Tablespoon oregano
420 grs. Tomato puree
Ground black pepper to taste
4 Tablespoons barbecue sauce (I used Kraft Original flavor, but any kind will do)
1 Teaspoon olive oil.
In a soup pot heat the olive oil and slightly brown the sausages and bell pepper, for about 4-6 minutes. Add the rest of the ingredients, except the barbecue sauce and bring to a boil. If you use chicken bullion cubes rather than chicken broth, wait for the water to boil before adding the cubes; they don't dissolve well in cold or warm water. Stir well and reduce the heat. Let simmer covered for about an hour, stirring every 10 minutes or so. You want to let the fluid almost be consumed.
When there is little liquid left, add the barbecue sauce and stir well. Check to see if the remaining liquid feels thick. if it does, remove from the stove, allow to cool and then serve. If not, let it simmer a little longer, keeping an eye on it at all times. When only a little liquid is left, it goes fast.
If things go well tomorrow, I'll post my recipe for cottage cheese enchiladas.
Sunday, June 10, 2012
Ginger Chicken
This is one of my first recipes, the very first to use chicken. It's very simple, but there's a lot of chopping involved.
Ingredients:
3 Chicken breasts
Sesame seed oil
Half an onion, chopped,
2 Cloves of garlic, chopped,
1.5 Carrots, chopped
2 Stalks of celery, chopped.
1/3 of a head of cabbage, shredded
1/3 cup jicama, chopped.
10-15 snow peas
2.5 teaspoons fresh ginger (2 minced, 1/2 grated)
3 teaspoons soy sauce
1/3 teaspoon turmeric
3 teaspoons corn starch dissolved in 1/4 cup of water
1 1/2 cups chicken broth
First saute 1 teaspoon of minced ginger with some sesame seed oil for 2 minutes, then cook the chicken. Cut it into bite-sized pieces and set it aside. In the same wok, stir-fry the vegetables with the rest of the ginger and 1 teaspoon of oil. Cook until the vegetables are as soft or crunchy as you want them.
Add the soy sauce and turmeric to the chicken broth and stir well. Add the chicken to the vegetables, pour the chicken broth on top and mix well. Add the corn starch mix and again mix everything well. Reduce heat to medium-low and simmer for about 5 minutes, mix occasionally so that everything is covered in the sauce.
This dish goes well with plain white rice or with curry rice
Labels:
bell pepper,
cabbage,
carrot,
celery,
chicken,
chicken broth,
garlic,
ginger,
jicama,
low-fat,
onion,
snow peas
Sunday, June 3, 2012
Fettucine with Poblano Chile Sauce
This is a new recipe I tried out today. I was going to make Enchiladas, but I forgot to get tortillas. Some other time.
I based this on an older recipe I've yet to post. It's a very versatile base, which serves well for creamy, yet low-fat pasta sauces. It's a bit odd, in that it uses cottage cheese.
Ingredients:
250 gr. fettuccine cooked to taste
5 Green tomatoes without husks
200 gr. of Pobalno chile rajas ("rajas" are thin strips of chile, usually Poblano, sauteed with a little oil; I buy mine frozen at any local supermarket), these are to be divided in half.
2 Cloves of garlic
1 Chicken bullion cube, low-fat and low-sodium
4 Cilantro branches, stems and all (you can remove the leaves from the stems; I find the stems as good as the leaves)
2 Scoops or about 220 gr. cottage cheese, either regular or low-fat.
1/3 Teaspoon powdered cumin
2 Tablespoons oregano.
1/2 Onion cut into thin slices and separated into rings
1 Teaspoon olive oil
2 Teaspoons corn starch, dissolved in 1/3 cup of water.
Place the green tomatoes whole in boiling water until they begin to change color. Get them out and place them in a bowl with ice water for a few minutes. When getting tomatoes, or anything else, in and out of a pot of boiling water, remember to be cautious. I use a slotted spoon.
Quarter the tomatoes and remove the core (not the seeds), then toss them in the blender with a trickle of water. Liquefy the tomatoes. With the blender off, add 1 clove of garlic, half the Chile Poblano in rajas, all the cottage cheese, cilantro and chicken bullion cube. Liquefy everything thoroughly.
In a deep saucepan, heat the olive oil. Once it's heated, add the onion and 1 minced clove of garlic. Saute until the onions begin to turn flexible. Add the rest of the Chile Poblano and cook for one more minute; you just want to soften them a little. Remove from the heat and let the pan cool for a few minutes.
When the saucepan cools, put it on the stove on low heat and add the sauce from the blender. Bring to a boil while stirring on occasion. When you begin to see bubbles forming, add the cumin and oregano and stir well (BTW I like to crush the dry oregano leaves before adding them to the mix). When the sauce begins to boil, or when larger bubbles form, add the corn starch dissolved in water. This last is a thickening agent only. If you think the sauce is thick enough, you may not want to add it. Keep on the flame for one or two more minutes, then pour the sauce over the pasta.
Please note that Poblano chiles are considered to be very mild, but some varieties can be quite hot. If you prepare the rajas yourself, think about removing the veins and seeds first. And try them before cooking, too, whether you make them or get them frozen, so you can decide how hot the dish will be.
As I said near the beginning, I like mixing cottage cheese and corn starch with liquefied vegetables in order to make creamy, low-fat sauces. In the future I'll post similar recipes, like Green Bell Pepper Pasta Sauce, and Elbow Macaroni with Chipotle Sauce.
As always, comments are welcome.
Labels:
cilantro,
cottage cheese,
cumin,
garlic,
low-fat,
olive oil,
onion,
pasta fettuccine,
poblano,
sauce
Friday, June 1, 2012
Textured Soy in Chipotle Sauce
Time for something a little off-beat (do you suppose "off-beat" might be a shortened version of "Off the beaten path"? Not that it matters).
Soy is a good source of protein and has about zero fat content. This gets it touted as a meat substitute. As far as nutrition goes, this may be so. But as far as texture and taste goes, it mostly doesn't work. Here and there you find pre-made dishes using soy which claim to taste just like beef or chicken, but all too often they're loaded with beef or chicken fat (a great deal of beef's flavor comes from fat, after all).
Just the same, I thought it was a reasonable ingredient to try in my diet. It took some doing, but I found ways to make it rather tasty. The problem lies in the fact that textured soy is almost devoid of flavor. The remedy lies in the fact that it absorbs flavors of things it's mixed with.
Please let me know if you try this recipe and like it, as I have a few other all-textured soy recipes, as well as some consisting of textured soy mixed with ground beef.
To begin with, textured soy (or textured soy protein, as it's often called) requires some preparation. First you need to hydrate it by soaking it in water for a few minutes. Then you drain it, and finally you squeeze the excess water out of it. You're left with a spongy stuff that looks and feel a little like cooked ground beef (but it doesn't taste like ground beef).
How to squeeze it best is a matter of some contention. I drain it into a large colander and squeeze it by hand. Some people put it in a clean rag and squeeze that. I suggest you look up the means online and choose whichever works for you.
However, in all my textured soy recipes, I assume the soy has been hydrated, drained and squeezed beforehand. if you sue it dry, the results will be disastrous.
Well, then.
Ingredients:
300 gr. of prepared textured soy (its about 125-150 gr. dry, give or take)
2 red tomatoes, peeled (you can remove the seeds, too, though I opt to leave them in)
2 cloves of garlic, quartered
1/5 onion, quartered
A handful of cilantro leaves, stems and all, chopped
1 cube chicken bullion cube, low fat and low sodium
1 or 2 whole chipotle chiles in adobo and some of the thick juice from the can (these are common in Mexico, naturally, and I think they are not too hard to come by in the US).
1 teaspoon olive oil
1 bell pepper (whichever color you like), chopped
1 or 2 stalks of celery, sliced.
Peel the tomatoes by whatever means you prefer (I blanch them, which makes the skin just peel off easily), remove the core, quarter them and put the in a blender. Add the onion, garlic, cilantro, chicken bullion cube and chipotles with their juice, along with a trickle of water. Liquefy in the blender. The mix will be a little chunky, especially if you do not seed the tomatoes. Set it aside.
In a deep saucepan or a pot, heat the olive oil and then saute the bell pepper and celery. If you like, you can add some chopped onion and/or garlic as well.When done to your taste, add the textured soy and cook for about five minutes, stirring constantly so it won't burn.
Reduce the heat and add the sauce you prepared in the blender.Mix very well, and let it come to a slow boil. Then simmer for a few minutes, all uncovered.
Ideally, it should look like this:
Now, I must warn you I use even more chipotles and don't find it very hot. But I was raised on hot, spicy food and snacks. If you can't take hot, spicy food, use a single chipotle, or even half of one. However, be advised chipotles have a subtle, smoky flavor, so the less you use, the less savory the end result will be.
Finally let me leave you with some trivia:
Chipotles don't exist in a "natural" state. They a re actually dried, smoked Jalapeño peppers. The canned variety are coked at a processing plant with some tomato paste and spices to produce the adobo juice you'll see in the can.
Just a little tidbit picked up working in the food distribution business...
PS this dish goes rather well with Mexican rice. I'll post the recipe for that shortly.
Wednesday, May 30, 2012
Curry Rice
As promised yesterday, here's the recipe for curry rice.
This entirely my own recipe. I wanted boiled, low-fat rice with some flavor. I found curry powder in the pantry. The rest was easy.
2.5 cups of water
2 chicken bullion cubes (low fat, low sodium)
1/2 tablespoon garlic powder
1.5 tablespoons curry powder
Half a teaspoon ginger
Half a teaspoon turmeric
1/4 onion chopped in large pieces (optional).
1 cup rice
Wash and drain the rice. Boil the water, add the chicken bullion cubes and stir (you may want to crumble them first so they will dissolve faster). When the cubes are dissolved, add the spices and the onion. Stir a bit then add the rice. Stir some more, reduce the flame to the lowest setting and cover the pot. Stir occasionally.Turn off the flame when the liquid is consumed, then fluff with a fork and serve. The rice ought to turn out yellow.
Subscribe to:
Posts (Atom)